](/media/headers/code2.jpg) Image credit: pixabay
Image credit: pixabay
Extracting the Payload from a CVE-2014-1761 RTF Document
This is a local mirror of a blog written by me and originally published by NCC Group.
Background
In March Microsoft published security advisory 2953095, detailing a remote code execution vulnerability in multiple versions of Microsoft Office (CVE-2014-1761). A Technet blog was released at the same time which contained excellent information on how a typical malicious document would be constructed.
NCC Group’s Cyber Defence Operations team used the information in the Technet blog to identify a malicious document within our malware zoo that exploited this vulnerability which appears to have been used in a targeted attack. In this blog we show one method of analysing the shellcode manually to extract the payload.
Matching the malicious document
The Technet blog gives a number of pointers toward a malicious document. First there is a bad header at the beginning of the document, which should be {rtf in a real document but is {rt{. Our sample matches this:

The MSComctl object is a short way into the document, in this case an ImageComboCtl:
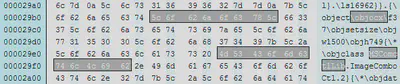
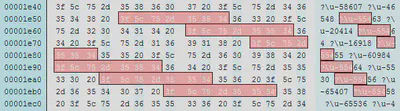
And it is easy to identify the potential ROP chain:
What will happen if the exploit is successful? If the exploit doesn’t work on our test systems, how can we manually extract the payload?
We know that the document should contain something useful, either saving malicious embedded content or using a URL download/execute. But where is this shellcode?
Analysing the shellcode
After identifying the vulnerability we can now hunt for the shellcode which will run on successful exploitation. The Technet blog suggests the shellcode is placed near the end of the file so this is a good place to start. Upon loading into IDA the correct option to choose is 32-bit disassembly.
Locating the shellcode
How can we quickly identify what might be code? One common technique in shellcode is using the hashes of Windows APIs, searching for these can often yield good results. Running a small IDA Python script over the database returns some possible matches:
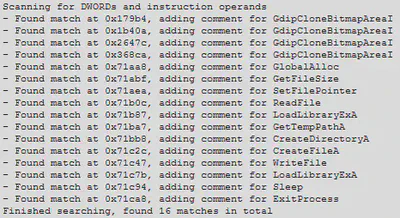
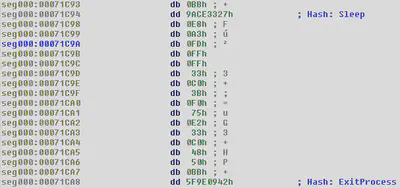
The first four are probably misdetections but the following API names definitely look suspicious. All of them are toward the end of the file, which ends at 0x71CB1. Checking the results for Sleep and ExitProcess shows the following potential shellcode locations:
Turning the bytes into code
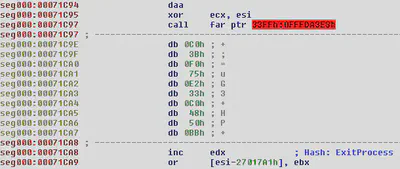
It is now possible to see where some of the hashed APIs might be used, which gives an indication of where the shellcode is located. We can begin to convert the unknown bytes into code (right click and choose “Code”, or use the shortcut C).
If we accidentally choose the wrong place to start analysing then it is possible to end up with “junk” results, as demonstrated below:
We can fix this by undefining the junk code (right click, “Undefine” or shortcut U), then making code at a slightly different offset. Very quickly the disassembly starts looking like real code:
Calling functions by hash
We can now see that the API hash is placed in the EBX register before a function is called, which has been manually named CallByHash by us in the disassembly above.
This function uses the standard mechanism of obtaining the PEB to find loaded modules:

The correct API is found using a simple ROR 0x13 (19 decimal) loop until the generated hash matches the value in EBX where the desired hash is stored (see comparison instruction at 0x71A83).
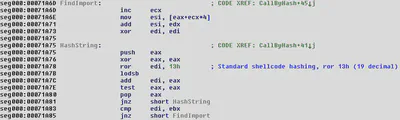
This allows the shellcode to locate and call any Windows API from kernel32.dll without knowing anything about the process which loaded the RTF file or including API name strings.
Finding ourselves – where is the RTF file?
The shellcode next needs to find the RTF file so it can locate and save the payload. It does this by iterating over all possible file handles until a valid one is found. This will always work because Word must have the RTF file open in order to parse it.
The code below tries each possible handle in turn, starting from 0x4 until 0x4000. It then calls GetFileSize, ensuring that the handle is valid by checking the return code.

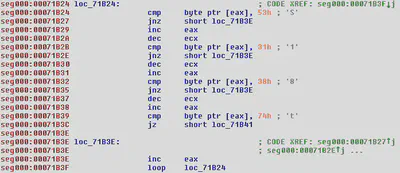
The code which follows is responsible for finding the start of the payload and saving it to disk. The position is first reset to the start of the file (offset 0) using SetFilePointer. The loop below then looks for the characters S18t in the document and obtains the offset if the string is found. If the characters are not present then the shellcode tries the next handle until an open file containing S18t is located.
Once the payload data is found it is unobfuscated with a simple XOR loop, seen below. This is important to note for when we extract the data manually later.

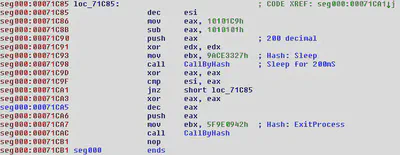
Following this are standard calls to GetTempPathA, CreateDirectoryA, CreateFileA and WriteFile, which save the payload to disk. Finally the shellcode calls LoadLibraryExA to launch the payload and then sleeps before calling ExitProcess to terminate Microsoft Word cleanly.
Unusual code or shellcode trickery?
Other typical techniques are also evident, for example this simple sequence:

The constant 0x40000000 (equivalent to GENERIC_WRITE permissions) is obtained by taking the number 0x41010101 and subtracting 0x1010101, avoiding null bytes in the shellcode. The same trick is used for some API hashes, for example CloseHandle below:

A simple calculation shows that the hash for CloseHandle would be 0xED00C776, which contains a null byte.
Extracting the payload
With the information above we can extract the payload data from the document and decode the executable which will be run. By searching for the string S18t the start of data can be found.
The bytes following S18t look suspiciously like an obfuscated PE header, using our earlier information about the usage of XOR 0x4 we can test to see if this is correct:
From here we can copy all of the bytes from offset 0x6c38 to the end of the file and then apply XOR 0x4 to obtain a PE file. The resulting file will contain the shellcode at the end; this could be removed if desired. Loading the payload into IDA shows a well formed executable which allows us to begin further analysis.
In this instance the payload was a 425KB executable which is often called the “havex RAT”. Crowdstrike attribute the use of this malware to a group called ENERGETIC BEAR in their Global Threat Report 2013. At the time of our analysis only 1 antivirus engine of 50 on VirusTotal detected the payload as malicious, once again highlighting the malicious code arms race.
David Cannings
Cyber Security
My interests include computer security, digital electronics and writing tools to help analysis of cyber attacks.